
An EMA scalping strategy trades short pullbacks inside a trend that four exponential moving averages define. This guide is for forex scalpers who want a rule set they can paper-trade today: the 9/21/50/200 stack, M5 entries, and the full cost math before a single rule. After reading it, you will be able to set the stack up in MetaTrader 5, score setups against one checklist, and size positions from risk instead of guessing.
An EMA scalping strategy is a short-term forex system that uses exponential moving averages to trade pullbacks inside a trend. Traders stack the 9, 21, 50 and 200 EMAs: the 200 sets the bias, the 50 filters the trend, the 21 marks the pullback zone, and the 9 triggers the entry on M5.
Why the cost math comes first
Scalping targets are small, so costs take a large share of every win. A setup that looks profitable on the chart can lose money after spread, commission and slippage. This section does the math first, because the numbers decide whether the setup is worth trading. The assumptions are labelled — rerun the table with your own broker's numbers before you trade.
| Cost item | Assumption |
|---|---|
| Spread, EURUSD raw account | 0.6–0.9 pip; 0.8 pip used in the math |
| Commission | $0.35 per 0.1 lot per side, so $0.70 round turn (0.7 pip at $1 per pip per 0.1 lot) |
| Slippage | 0.2 pip |
| Total round-turn cost | 1.6 pips |
| Target | Cost | Share of target |
|---|---|---|
| 5 pips | 1.6 pips | 32% |
| 8 pips | 1.6 pips | 20% |
| 12 pips | 1.6 pips | 13% |
A 5-pip target hands almost a third of the win to costs before the trade moves. That is why this setup uses an 8-pip stop with a 12-pip first target (1.5R), where costs take 13%. On a standard account with a wider spread, the minimum target must grow with it.
The break-even win rate shows the same point from the other side. With a stop S, a target T and a round-turn cost C, it is (S + C) / (S + T). For an 8-pip stop and 1.6 pips of cost:
| Reward | Target | Break-even win rate, no costs | Break-even win rate, with costs |
|---|---|---|---|
| 1R | 8 pips | 50.0% | 60.0% |
| 1.5R | 12 pips | 40.0% | 48.0% |
| 2R | 16 pips | 33.3% | 40.0% |
At 1.5R you must win 48% of trades to break even after costs, not 40%. The trend filters cut losing trades, and the 1.5R minimum target keeps the break-even rate reachable.
What the ranking guides get wrong
Four guides dominate this keyword, and they share four gaps:
First, unsourced win rates. One ranking guide states a 52.3% win rate across 2,847 trades without publishing the trade log, the date range, or the broker conditions behind it. Another publishes a 55–65% band for the 9/21 setup, labelled only as illustrative. A win rate without a test log is a claim, not evidence.
Second, no full cost math. The guides mention spread in passing, but none shows cost as a percentage of the target with a break-even table. The RoboForex guide is the exception: its ribbon table shows a 12-pip stop against a 5–7 pip target needs a 63–71% win rate — but before spreads and commissions, which is exactly the part that decides whether the variant survives.
Third, no worked position-size example. The guides say "risk 1% per trade" and stop there. Nobody shows the arithmetic that turns a risk percentage into a lot size, so beginners guess.
Fourth, no explicit when-not-to-trade rules. The guides say "avoid choppy markets" and leave it at that. This article gives a number: skip the trade when the spread is above 20% of the target, and skip the session when the EMAs are flat.
The 9/21/50/200 stack: what each line does
An EMA weights recent prices more heavily than a simple moving average, so it turns faster. EMA = price × k + previous EMA × (1 − k), where k = 2 / (n + 1). For the 9 EMA, k = 0.20; for the 21, k is about 0.091 — so the 9 reacts roughly twice as fast, which is why it triggers entries and the 21 marks the pullback zone.
Each line in the stack has one job, and only one:
- 200 EMA — bias. Price above it means long bias only; below it, short bias only. Read it on H1 — a regime line, not an entry signal.
- 50 EMA — trend filter. It must slope in the direction of the trade. A flat 50 EMA means no trade.
- 21 EMA — pullback zone. Price dips toward it during a trend; the dip is where the entry is prepared, never chased.
- 9 EMA — trigger. The entry fires when a candle closes back above the 9 (longs) or below it (shorts) after touching the zone.
If you keep only two lines, keep the 21 and the 200: trend plus regime, without the micro-signals.
9/21 vs 7/14 vs 5/13 ribbon
There is no single best EMA setting for scalping. Shorter periods give more signals and more false ones; longer periods give fewer signals and later entries. The three settings the ranking guides teach compare like this:
| Setting | Timeframe | Signals | Who it suits |
|---|---|---|---|
| 9 and 21 EMA | M5, M15 | Fewer, later, smoother | Later entry, fewer false signals |
| 7 and 14 EMA | M5, M15 | More frequent, pattern-confirmed | Pattern traders who want crossover confirmation |
| 5 and 13 EMA ribbon | M1 | Most frequent, most false crosses in chop | Screen-watchers who act in seconds |
The 7/14 pair, taught by the RoboForex guide, enters on a pattern or level break confirmed by the 7 crossing the 14. The 9/21 pair here enters on a pullback to the 21 confirmed by a close back over the 9. 7/14 reacts sooner and gets chopped more in a range; 9/21 waits longer and misses the first part of fast moves. Pick one pair, test it on history, and do not switch inside the same week.
Timeframe hierarchy: H1 bias, M5 structure, M1 trigger
One timeframe cannot do three jobs. Use H1 to set the bias, M5 to find the structure, and M1 only to time the trigger candle.
- H1 — bias. Price relative to the 200 EMA and the slope of the 50 EMA. Long bias on H1 means longs only on M5.
- M5 — structure and entry. The pullback, the swing that holds the stop, and the rejection candle all live here — the primary chart.
- M1 — trigger timing only. If the M5 rejection candle is still forming, M1 shows whether momentum is returning. Never take an M1 trigger against the H1 bias.
Trade London, roughly 07:00–11:00 UTC, and the London–New York overlap, roughly 12:00–16:00 UTC. EURUSD, GBPUSD and USDJPY are at their most liquid then and spreads are tightest. Avoid the Asian session: ranges are thinner, the 9 and 21 cross back and forth, and the same rules produce whipsaw entries.
Entry, stop and target: the rules
Long rules. Shorts are the exact mirror image.
- H1: price is above the 200 EMA.
- M5: price is above the 50 EMA and the 50 EMA is sloping up.
- M5: the 9 EMA is above the 21 EMA and both are rising.
- Pullback: price dips into the 9/21 zone without closing below the 21 EMA and without breaking the last swing low.
- Trigger: an M5 candle closes back above the 9 EMA — best as a rejection candle, with a wick dipping into the zone and a body closing in the trend direction.
- Entry: at the open of the next M5 candle. Do not enter mid-candle.
- Stop: 1–2 pips beyond the pullback swing low, plus the spread. If that stop is wider than 10 pips, the setup is too stretched; skip it.
- Target: 1.5R. Close half at 1R, move the stop to breakeven, and trail the rest under the 9 EMA; exit when an M5 candle closes below the 9.
A trade meeting rules 1–5 with less than 1.5R of room to the next resistance level is not a trade — check that distance before entering.
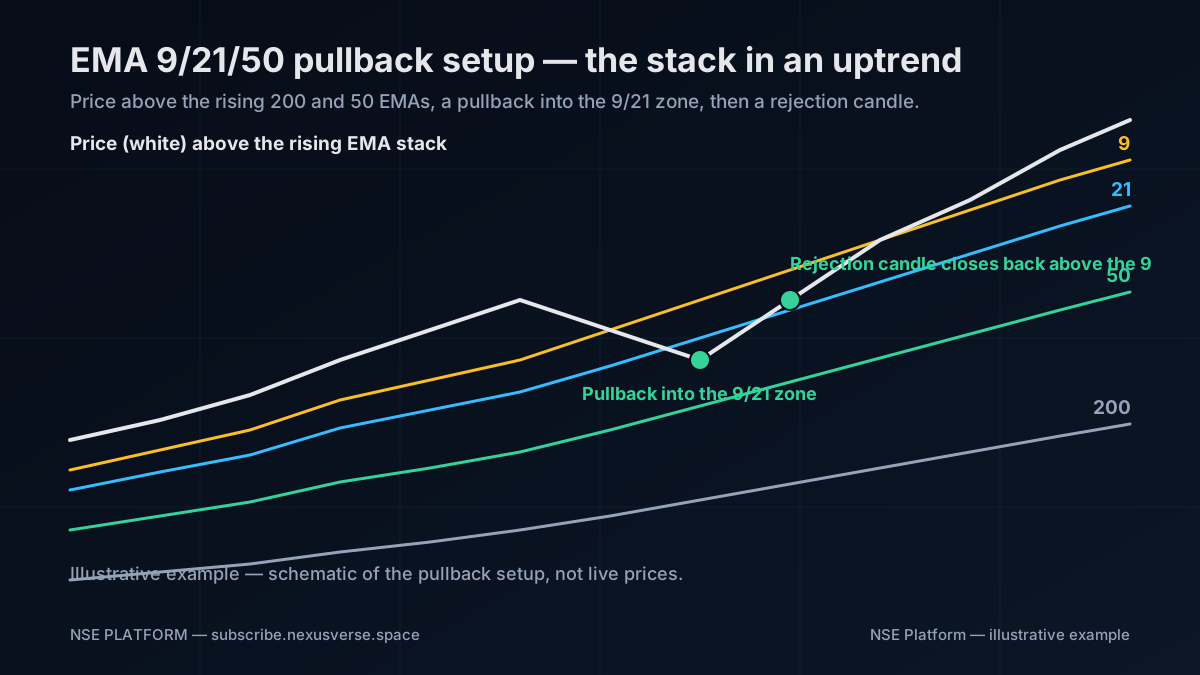
The schematic above shows the stack in an uptrend: price above the rising 200 and 50 EMAs, a pullback into the 9/21 zone, and a rejection candle closing back above the 9. It is an illustrative schematic, not live prices.
Worked example: EURUSD on M5
Example — not live prices. The numbers below illustrate the position-size formula; they are not a real trade or a price forecast.
- Account: $10,000.
- Risk per trade: 0.5% of the account = $50.
- Stop distance: 8 pips.
- Pip value: 0.1 lot of EURUSD = $1 per pip.
Position size = risk dollars / (stop in pips × pip value per 0.1 lot) = $50 / (8 × $1) = $50 / $8 = 6.25 units of 0.1 lot, which is 0.625 lots.
In practice, round down to 0.60 lots, never up. The rest of the example uses 0.625 lots, where the arithmetic is cleanest.
- Target at 1.5R: 12 pips. Gross win = 12 pips × $6.25 per pip = $75.00.
- Round-turn cost: 1.6 pips × $6.25 per pip = $10.00.
- Net win after costs: $75.00 − $10.00 = $65.00.
- Partial at 1R (8 pips): close half for a gross $25.00, move the stop to breakeven, and let the rest run to 1.5R or the 9 EMA trail.
With a 5-pip target instead, the gross win is $31.25 and the $10.00 cost takes 32% of it — the cost table from the first section, applied to one trade.
When NOT to trade
- The 9 and 21 EMAs are flat and intertwined. Flat lines mean churn, not trend.
- Price is chopping across the 200 EMA, crossing it twice within an hour. The bias is unreadable.
- The spread is above 20% of the target. For a 12-pip target, skip the trade if the spread is above 2.4 pips. For a 5-pip target, skip it above 1.0 pip.
- Five minutes before to five minutes after red-folder news: CPI, NFP, FOMC decisions and rate announcements.
- Outside London and the London–New York overlap, unless the H1 trend is exceptionally clean.
- After three consecutive losses. The pause rule in the next section applies.
Risk rules
- Risk 0.25–0.5% per trade. Never more, even after a winning streak.
- Daily loss limit of 2%: when the day's losses reach 2%, stop trading for the day. No exceptions.
- Three-loss pause: after three consecutive losses, stop for at least 30 minutes and review the trade log.
- Never move a stop further away once it is placed. Never add to a losing scalp.
- Journal every trade: setup, session, spread at entry, outcome in R.
Seven mistakes and how to fix them
- Trading every 9/21 cross. Crosses happen constantly in a range. Fix: require the pullback, the rejection close and the 50/200 filter.
- Stops that ignore the spread. A stop exactly at the swing low gets hit by the spread alone. Fix: place it 1–2 pips beyond the swing, plus the spread.
- Scalping the Asian session with London rules. Thin ranges turn the 9/21 into a whipsaw machine. Fix: London and the overlap only.
- Chasing a missed trigger. Entering late buys the top of the move. Fix: a missed entry is no trade — wait for the next pullback.
- Moving the stop to give the trade room. The stop marks where the idea is wrong. Fix: if it is too tight for the volatility, the setup is wrong, not the stop.
- Targets smaller than twice the spread. A 5-pip target on a 1.6-pip cost gives the broker a third of the win. Fix: minimum 1.5R target; check the cost percentage first.
- No daily loss limit. One bad morning becomes a blown account through revenge trading. Fix: a hard 2% daily stop, written down before the session.
FAQ
What is the best EMA for scalping?
There is no single best EMA. The 9 and 21 pair on M5 balances speed against false signals, the 7 and 14 pair reacts sooner and needs a pattern to confirm it, and the 5 and 13 ribbon suits M1 traders who can act in seconds. Pick one setting, test it on history, and keep it for a month before judging it.
Is the 9 and 21 EMA good for scalping?
Yes, on M5 and M15, with a trend filter. The 9/21 pair reacts later than 7/14, so it gives fewer signals and enters a little later. That is a fair trade when the 50 and 200 EMAs filter out counter-trend entries. Without the filters, the pair whipsaws in a range like any other crossover system.
What timeframe is best for EMA scalping?
M5 is the primary chart, with H1 setting the bias and M1 timing the trigger. M1 alone gives the most signals and the most noise, so it works only inside the H1/M5 structure. M15 works too, with fewer trades and wider stops.
Does the EMA scalping strategy work on gold (XAUUSD)?
The rules transfer, but the numbers do not. Gold moves more per minute than EURUSD, so stops must sit beyond the last swing rather than at a fixed pip distance, and the spread is wider. Rerun the cost table with gold's spread and commission first, and expect fewer valid setups per session.
Related reading
- RSI scalping strategy — RSI 7/9/14 entries.
- VWAP scalping strategy — the VWAP bounce setup.
- Best indicators for scalping — the Indicators & Tools Hub pillar.
- Scalping strategy — the hub guide.
Sources consulted
- AppTrading — "Best EMA Settings for Day Trading and Scalping" (9/21/50/200 stack). https://apptrading.ai/en/blog/best-ema-settings-for-day-trading-and-scalping/
- RoboForex blog — "EMA Scalping Strategy: Best Settings, Rules and 3 Examples" (7/14 EMA, ribbon variant, break-even table). https://roboforex.com/blog/education/scalping-strategy-with-two-moving-averages-ema-description-and-rules/
- ChartingLens — "Scalping Trading Strategy: 4 Setups + a Real Example" (9/21 pullback rules, win-rate table). https://chartinglens.com/blog/scalping-trading-strategy
Educational material only — not financial advice. Forex and gold trading with leverage can produce substantial losses. Backtest and demo-trade any setup before risking real capital.